Showing posts with label meatless meals. Show all posts

Wednesday, March 9, 2011

The Pyrate's Soupe L'Ognion (French Onion Soup)

Yesterday the Pyrate made the BEST FRENCH ONION SOUP I HAVE EVER HAD!  I will never crave it again from elsewhere... not even that French bistro at the Grove promenade.  If you are a fan of French Onion Soup, you will fall in love all over again when you learn to make it at home from scratch.  It is truly a beautiful thing.
You'll need oven proof dishes, either porcelain, ceramic or stoneware individual crocks, ramekins, or bowls.  We used porcelain ramekins, which worked fine except they are a pain to get clean again... you have to soak them in baking soda and hot water overnight to get the baked-on brown stains off.  The picture below is not mine.  Just wanted to give you something to look at.  We forgot to take pics before we ate ours!  Ha!  Sorry!


This recipe was inspired by one we saw Alton Brown (the food scientist dude) make on the Food Network with some slight alterations because his ended up with not enough onions and even the entire recipe was a bit scant to truly feed 6 people like he said it would.  
Enjoy! 

7 large sweet onions (red or sweet maui or a combination of both as we did for ours)
4 tbsps butter
sea salt
1 cups of white wine (we used a chardonnay)
32 oz of beef broth (or vegetable if you prefer)
12 oz of chicken broth (or more vegetable if you prefer)
2 cups of apple cider
1 bouquet garni (thyme sprig, bay leaf, and parsley sprig tied together with kitchen twine)
1 loaf of country style bread
sea salt and fresh ground pepper
Cognac
2 cups of grated Gruyere


Cut onions in half then thinly cut into half-moon slices, mix together if using two kinds.  
Melt the butter in the bottom of a dutch oven or large soup pot over medium low heat. 
Spread a layer of onions over melted butter and sprinkle layer with a pinch of salt.
Repeat layering onions and sprinkling with a pinch of salt til all onions are layered in the pot.  Do not stir.
Leave to cook down over medium low heat for 15-20 minutes then stir. 
Continue cooking and occasionally stirring til onions are carmelized to a dark mahogany and reduced to about 2 cups.  This will take about 45 min. to an hour, and don't worry if it seems it's burning.
Add the wine and cook over high heat until liquid is reduced and is syrupy. (We had a chuckle-worthy moment when we got to this part because the Pyrate imitated Julia Childs as he sloshed the wine into the pot without a measuring cup. )
Add broths, cider, and herbs, turn down fire, cover, and simmer for 15-20 minutes.
Place oven rack on top notches of oven and heat your broiler.
Cut bread in rounds large enough to fit soup bowls.
Place the slices on a baking sheet and drizzle with a bit of olive oil.
Broil in the oven til nice and toasty, turn and repeat on the other side.
Season soup mixture with salt, pepper.
Add a splash of cognac. We used about 1/4 cup.
Remove herbs and ladle soup into crocks leaving one inch from the top.
Place bread round on top of soup and top with grated cheese.
Broil until cheese is bubbly and golden.
Be sure to watch it so that it doesn't burn.
YUM!!

Thursday, December 3, 2009

How To Make A Crudite!


I made this for the Pyrate's 1st birthday party... there were more grownups than children, obviously.


 I love the idea of food as art.  It brings great pleasure to the eye to have food presented in such a way.  In most situations you will find that I opt for the more rustic, more primitive presentations.   Over-grooming, does nothing for me.  There is much to be said for a beautifully done crudite'.   (the link will give you some creative ideas for displays) It's an art form with many shifting variables that you can mix and match to suit the theme, mood, and occasion of your party.
This fabulous three dimensional display of edible goodies is easy, easy, easy and makes an accessible spread for pre-dinner snacking for your guests at a party or holiday function.   Just grab up what's in season at your local farmers market.  You can make vegetable, fruit, or a combination of both.  Some items should be trimmed or peeled.  Others should be cut into finger size pieces such as the bellpeppers and broccoli in the photo.  Other items, such as cherry tomatoes, bananas, strawberries, mushrooms, and most fruits should be left whole. You should 3 minute blanch items such as asparagus, broccoli, sugar snap peas, and green beans, in rapidly boiling water so they are more tender to the bite.  Then fill gourds, cabbage, squashes with dips, vinaigrettes, mustards, etc.   Display as a centerpiece on your dining table, or as I did here, use an entire surface of a sideboard or buffet.  I used all kinds of hidden items to create height, depth, and dimension to this display.  For a smaller crudite you can start out with a platter and have the items spill over onto the surface of whatever space you will display it on, or you can make it a bit more conservative by keeping it more neat and displayed on platters.   Use fancy garnish techniques on some items to make your crudite more interesting.   Radishes, carrots, celery, can be manipulated to fan, curl, and other kooky but cool looking effects, when creatively cut and shocked in an ice bath.  Also some items can be placed there whole just for decoration.  You can use them later after the party for some sort of recipe, but they will simply serve to make your display more plentiful and extravagant. 
A large crudite such as mine in the picture is enough for a casual afternoon party, with perhaps the addition of a cheese board and some wine and juices.

Oh, yeah.

Did I mention this is a healthy alternative to chips, candies, and other typical party junk food?  If your veggies are farm fresh, and high quality, and your dips and sauces are flavorful, and your wine is tasty, your guests will not even miss that traditional casual party fare and they'll be amazed at this display that will remind them of master paintings in a museum.  

Wednesday, December 2, 2009

Gnocchi with Fresh Tomato Basil Sauce


Dishes like this are very typical, very traditional Italian staples.  We eat it as a meal, however, in Italy this would be one of the first courses, before a main entree with meat and vegetables.   I wanted to make something quick, easy, and satisfying enough for my boys to not look at me like I'm trying to starve them.  Pasta sounded good, but kinda boring so I decided to get some gnocchi, which are little dumpling like balls of potato pasta dough that get boiled just like pasta, until they are the perfect consistency. 
I wanted to make a meatless meal tonight as well, so I figured a good tomato sauce would be nice, and since I was at Trader Joes, I could have gotten a pretty decent sauce in a jar from their shelves and everyone would have been happy, however, I decided to make my own sauce with two baskets of mini heirloom tomatoes I got on Sunday at the farmer's market.  Oh!  I also had a huge bunch of fresh basil that was gonna go bad in another day or so if I didn't use it, so homemade sauce it was!!!


 The gnocchi I used were found in my local Trader Joes in the pasta section of the store.  Most grocery stores will now carry gnocchi.  If you can't find it easily, ask, perhaps you're looking in the wrong place.  Sometimes they'll have it in a refrigerated section with fresh pastas. 


Believe it or not that's pretty much it, you'll need a large pot of boiling water, some garlic, and some cheese for the top, and that's it.  Gnocchi with Tomato Sauce in under an hour!


THE PLAYERS: (your grocery list)

Gnocchi (two packages of gnocchi will make enough to feed four to five people.  find it in your grocery's pasta section.) Tomatoes (I used mini heirloom tomatoes, cut in half, which provided a very nice variety of color in the sauce. You can also use regular size heirlooms, or organic tomatoes on the vine.  You'll need a total of 4 cups of cut up tomato.)  Fresh Basil (in your produce section.  You'll need about 1/2 cup cut in a chiffonade.) Garlic (you'll need 4 cloves of fresh garlic, crushed.)Red Wine (I used a bordeaux.  You can use any good quality  dark red wine.)


PREPARATION:

Chop your tomatoes into 1 inch chunks.  If you're using mini ones like we did, cut them in half, leaving the very small ones whole.
Add about 4 tablespoons of Extra Virgin Olive Oil to a large Saute pan and heat on high until oil is sizzling. 
Add tomatoes.  


The tomatoes will go through a couple of stages while they cook.  First the juices will escape into the pan, then the water in the tomato juice will cook off, and the tomatoes will begin to fall apart.  Then the tomatoes will begin to reduce into a thick consistency.  

Add crushed garlic to the tomato mixture. 
Put on a large pot of water over high heat, cover with a lid. 


To chiffonnade your basil, stack the leaves, roll them like a cigar, and then cut thin slices to make a shred. 
Add 1/2 of the bottle of red wine to the tomatoes and stir in the basil.


The wine will re-liquefy your tomatoes, so now you'll put a lid on it and turn the fire down to simmer this for 20 minutes.  


 When your pot of water starts to boil, add 1 teaspoon of salt, and your gnocchi. 
The gnocchi will sink to the bottom.  
Bring back to a boil. 
When the gnocchi float to the surface of the boiling water, allow it to cook for 2 minutes more.  
Then drain immediately. 
Check your tomato basil sauce, it should be slightly thicker.  Turn the fire off.  
Add gnocchi to your saute pan and toss with the tomato basil sauce to coat the gnocchi. 
Serve with thin slivers of parmesano reggiano cheese, perhaps a bit of fresh ground pepper, and hot, crusty bread. 

Yum.


Tuesday, December 1, 2009

BeeBee's Beautiful Butta-bean Soup


California weather rarely dictates more than a light sweater, but where we live, at the foot of a mountain range in desert-like conditions... warm days, and cool nights.  When the winds do blow in the wintertime, and the nights drop down into the 40's and low 50's we think we're going to start sprouting icicles.

Of course, this is not a rational thinking, but we have to make due with the variations in weather that we've got.  So yesterday, in celebration of the beginning of our winter winds, I decided to make a soup.  The Pyrate and I stopped in our local grocery store and I was planning to buy some lentils and make some curried dahl, but then I changed my mind because we have a big chunk of smokey black forest ham left from Thanksgiving, (you can also make this meatless...) and so I thought, what about a nice green pea soup... But I wanted to take a short cut and use frozen peas instead of dried ones, and that made me a little unsure, so whilst browsing the frozen vegetable aisle, beautiful packages of organic Butter Beans caught my eye.   I love butter beans.  They're kinda similar to lima beans except they have a bit smoother, waxier, creamier taste than the grainy, green flavor of lima beans.

That was it!  "This is what we're making tonight!!  A soup!! With butter beans!!"  The Pyrate was not amused at all.  He is not necessarily an automatic lover of legumes, and peas, limas, and that sort of thing.  Come to think of it, if I'd told the Austrian in advance what I had planned he'd have protested immediately, claiming he did not at all like soup.  "It's a waste of time, and it's not very filling," would be his claim.  The Pyrate just stood there silently frowning skeptically, yet resigned to years of experience that he really didn't have any say in this situation... unless it was his birthday... then he'd get about a 30% vote.
Anyway, I built this soup around Sunday's farmer's market goodies already in my kitchen, and made the butterbeans the star of the show!


It's a hearty soup with large, chunky bites, a tomato broth, fresh herbs, and the unusual addition of a huge handful of chopped fresh kale I just happened to have leftover from the weekend.

How did it go over with my men?  Well, the Pyrate was standing watch over this soup long before it was done, reveling in the fragrance, and as soon as he was permitted a bowlful of its goodness he gobbled it up in a jiffy, complaining that his bowl was too small!  The Austrian never mentioned not being a fan of soup.  He simply sat next to me, frantically slurping it up, burning his mouth repeatedly because it was so good, he couldn't wait for it to cool!  When I was half way through my portion, I looked over to see that the Austrian was leaning back in his seat, rubbing his belly with one hand and loosening his belt with the other.
I am changing his attitudes about certain foods, one recipe at a time!  I freeze this soup in individual, microwaveable containers so that it can be taken to work for lunch whenever we like.  So making a big pot never goes to waste.  This recipe will serve 8 generously with leftovers.
Make this soup any time you want to warm up, or even in the summer as its fresh vegetables are perfect anytime of year with nothing more than a hunk fresh baked cornbread and a glass of lemonade!

P.S.  Just after I posted this recipe, I got a text from the Austrian... who is at work:
"Best soup ever!!!" 


THE PLAYERS: (your grocery list)
Butter Beans (Three 16 oz. packages of butter beans from your grocer's freezer section.  If you decide to be adventurous and search for the dried version, go ahead.  You'll need to soak them for at least 8 hours then cook them with an extra 2 cups of water added to the recipe, for 3 to 4 hours until the beans are tender.) Onions, Garlic, Celery, Carrots, Kale (You'll need one full bunch.) Potatoes (Use a waxy variety of potato, such as Yukon Gold, fingerlings, baby red, etc...They will hold up better in the soup's slow cooking) Smoked Ham (optional)  (I used about 24 oz of Black Forest ham cut into 1 inch cubes.  You can also substitute cooked turkey or chicken or make this completely vegetarian as well.) Canned Crushed Tomatoes (I look for canned tomatoes that are canned fresh at their source, organic, and I like the Italian companies for the quality of the tomatoes.  You'll need one 24 oz can.) Broth (I used 32 oz of organic, free range, low sodium chicken broth.  Vegetable broth can be substituted) Tarragon (fresh tarragon is a nice compliment to this soup!) Bay Leaves (You'll need 2 bay leaves) Sage (Your grocer's produce section should have fresh sage.  If you can't find it, substitute 2 tablespoons of dried rubbed sage.) Sea Salt, Black Pepper, Cayenne Pepper

PREPARATION:

Make a mirepoix  by cutting up 1 large onion, 3 stalks of celery, 5 medium sized carrots into a large, chunky dice around the same size or a bit larger than the butter beans.


Saute in 1/2 stick of melted butter, in the bottom of a large stock/soup pot just until onions are slightly transparent.


Add 4 cloves of crushed garlic to the pot.
Dice your potatoes about the same size as the other vegetables, and add to the pot.
Tear the Kale into pieces just about twice the size of everything else and add to the pot. 
Add 4 tablespoons of fresh chopped Tarragon, 2 tablespoons of fresh chopped sage, and 2 bay leaves.
Add diced ham (turkey or chicken)

Add 1 tablespoon of sea salt, 1 tablespoon fresh ground pepper, and 1 tablespoon of cayenne. 
Add 1 16 oz can of crushed tomatoes. 
Add 32 oz of broth
Add 1 cup of water
Bring to a boil.
Reduce heat and cook for 1 hour on low heat, or until beans are tender.

Enjoy!!!

Monday, November 30, 2009

Sweet Potato Kahlua Swirl Cheesecake!


Sweet Potato Kahlua Swirl Cheesecake, all packed up and ready to go to 
Auntie Ruby's house for Thanksgiving Dinner.

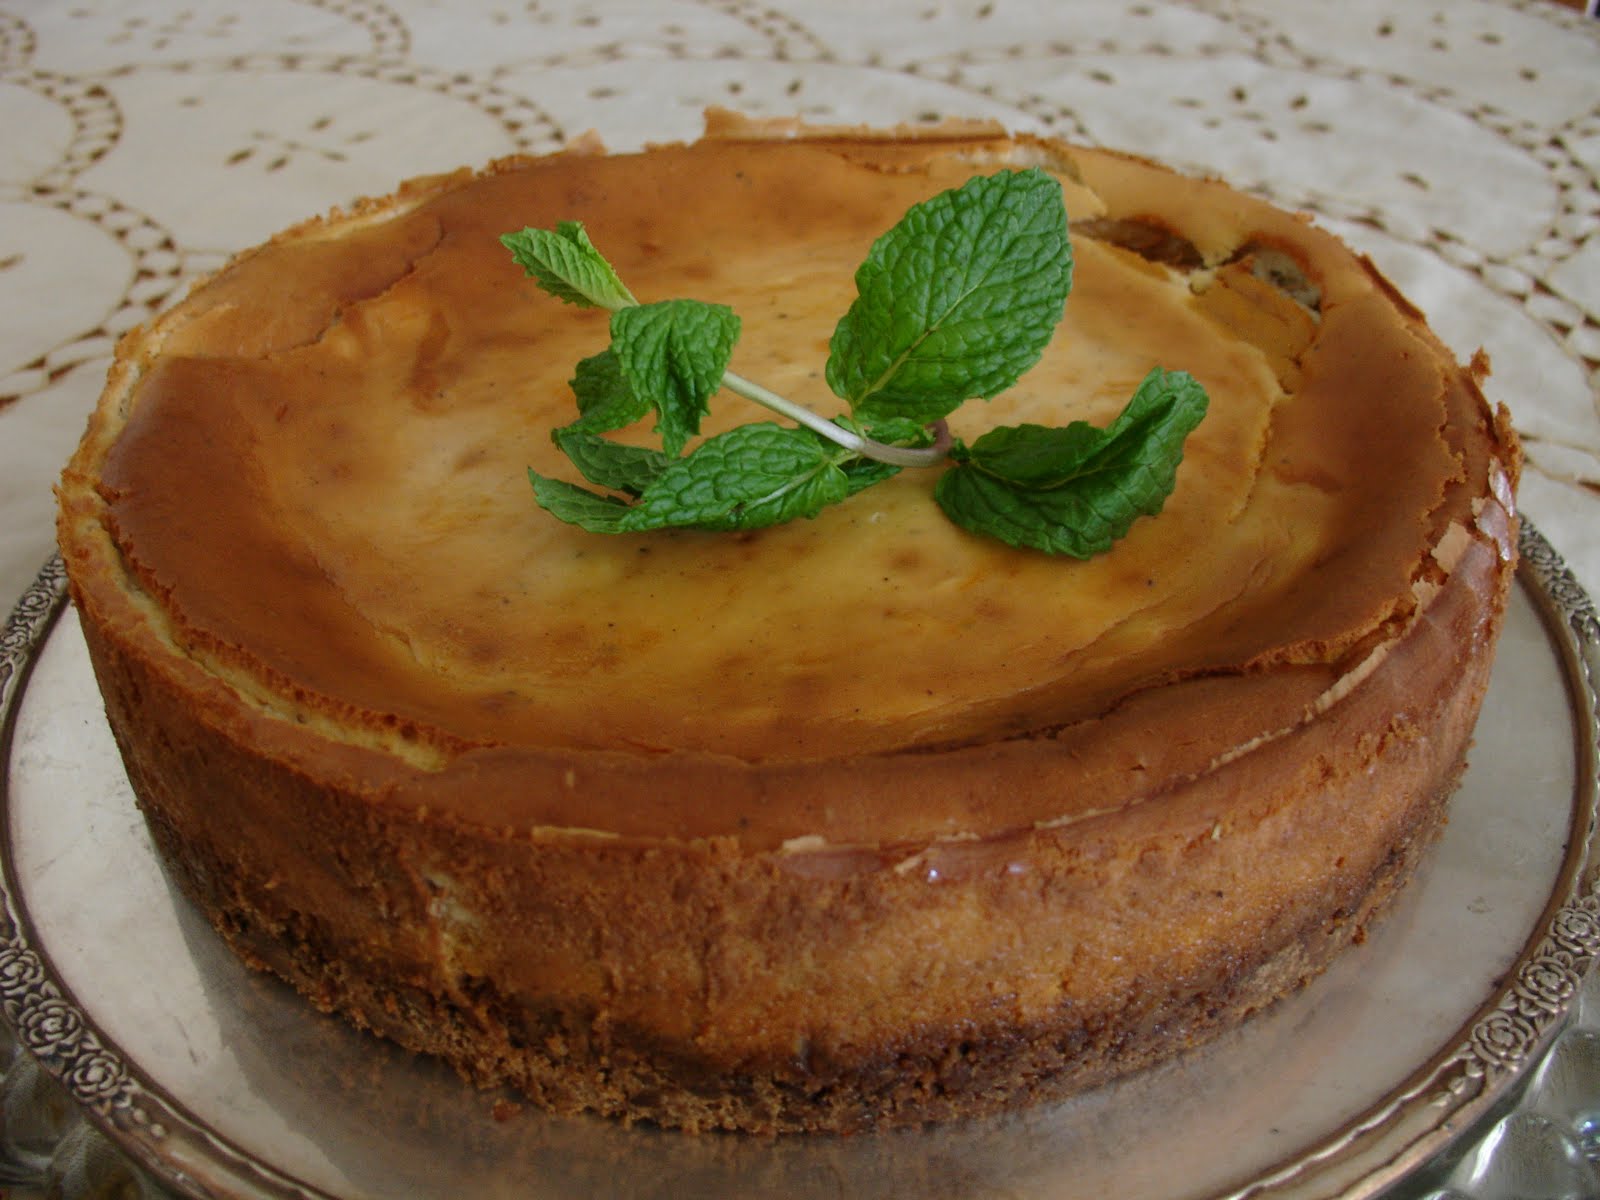
Yes, there are quite a few pictures in this posting.  I couldn't help it.  I needed you to see this one from every angle, to see the surface, the sides, the crust up close, the interior goodness.   I don't know about you, but as far as I'm concerned these photos say more than I ever could...

I don't make this more than once or twice a year, for a special occasion... usually at Christmas or New Years, or, as is the case this time, for Thanksgiving Dinner.  Many years ago I used to make a cheesecake with pumpkin and kahlua.  This is a much different taste.  The squash-like flavor of pumpkin is not anywhere near as sweet or rich as sweet potato.  I played around with it until the sweetness and moisture balance was right and the following recipe is the result.
 

When it was time to serve up desserts, and our family partook in the first mouthful of this creamy rich pleasure, eyes closed, moans escaped, my name was called out.  It was good for me.   Ha!  I love a successful experiment.   The wedges of this cheesecake went so fast that I didn't get any.  I was happy that I'd made two....

...and that at the last minute, I'd decided to leave one at home.  Three days have past, and everyone who's passed through our doors has had a taste... and for now, this decadent treat, with its coffee liqueur infused swirls of cream cheese, the natural sweetness of sweet potato and vanilla, and its graham cracker-gingersnap cookie crust,  is all  but a memory.  You'll find this to be surprisingly not cloyingly sweet because the potatoes are allowed to carry that part of the flavor profile, with just enough sugar added to balance the chemistry.


There are two very basic things you'll need to know about making cheesecake.  You need a bain marie, and a 9 inch spring form pan.   A bain-marie is a french technique that loosely translates to mean a water bath.  Sometimes it's used to melt chocolate by setting the bowl of chocolate over a pot of hot water.  The other use, which you'll be doing here, is to place a pan of water on a rack in your oven below the rack your cheesecake will cook on.  The purpose of this is to maintain a moist environment in the oven so that the surface of your cheesecake will not dry out so much that it cracks.  Now, this is not a huge tragedy.  It will still taste the same if it cracks... well.... it might actually have a slightly less tender surface... but it will not ruin the cheesecake except for the esthetics, which in this case, I must say, is something worth preserving.  The cheesecake I decided to keep at home, was the first one I did, and I forgot to use a bain-marie, and there was an enormous crevice across the middle of it when I pulled it from the oven.  Again, not a tragedy, but not perfect.  The second cheesecake, as you can see had a much better appearance because I added the bain-marie to the oven.  
A springform pan is a pan made especially for baking cheesecakes and other types of breads and baked goods that are deep  and would be difficult to remove from the pan if the sides were not removeable.  A spring form pan has a base, and a removeable ring that clamps shut onto the base, then when your cake is done and you are ready to remove your cake, you simply release the clamp and voila!  The one I have is made by a german company called Oetker.   Amazon.com has one you can purchase here:


THE PLAYERS: (your grocery list)
Mashed Sweet Potatoes (Don't confuse these with yams. They have purplish burgundy skins and orange insides.  Anything else is NOT a sweet potato.  You'll need 2 cups of mashed sweet potatoes.  I don't list a number of these because it depends on how big your potatoes are.  Err on the side of having too much and save the extra to make sweet potato pancakes the next morning...Peel and cut them into large cubes to cook them faster in boiling water, then drain and mash and allow to cool completely before using.) Cream Cheese (For quicker preparation, get the whipped/spreadable cream cheese in tubs.  You'll need 24 ounces for one cheesecake) Graham Crackers (Find these in the cookie and cracker aisle.  You'll not use the entire box.  You'll need enough to make 1 cup  of  crumbs in a food processor.  Save the leftovers for s'mores..) Gingersnaps (Also in the cookie and cracker aisle.  You can find these in just about every American grocery store.  You can substitute another brand or similar ginger flavored crunchy cookie. You'll need enough to make 1 cup of  crumbs in a food processor.) Unsalted Butter (you'll need 1/4 cup for this recipe) Powdered Sugar (I try to make it a habit to buy organic, whenever possible but if you can't find it, conventional powdered or confectioner's sugar will do just fine for this purpose.  You'll need 1/4 cup for this recipe) Eggs (You'll need 6 eggs, go for organic and farm fresh if you can...) Vanilla Bean (You'll be using the inside of a vanilla bean in this recipe.  If you can't get one, then use 1 tablespoon of vanilla extract.   But I highly recommend using the bean...) Demerara Sugar (...or Turbinado Sugar... either will work.  You need 1 1/4 cup for this recipe. Regular granulated will work...) Ground Cinnamon, Ground Ginger, Whole Nutmeg (I buy this whole because it keeps its flavor better that way. You simply use a rasp to grate off as much as you'll need... 1/2 teaspoon for this recipe.) Kahlua Liqueur (Find this in any liqueur store or grocery with a liqueur department.  It's great for cold weather drinks by the fire.  A little in your coffee will warm things right up!  You'll need 1/2 cup for this recipe)
PREPARATION:
Cut your potatoes into large cubes, place in a large pot, add enough water to cover, boil rapidly until cubes are tender to the fork.  Drain, mash, and set aside to cool.
Preheat oven to 360 degrees.

In the large bowl of a food processor, add equal amounts of gingersnaps and graham crackers and pulverize until a grainy meal is formed.  There should be no large chunks. Make sure you have 2 cups of crumbs.

Mix in 1/4 cup of powdered sugar, and then 1/4 cup of unsalted butter.
Press this crumb, powdered sugar and butter mixture into the bottom of your springform pan, making sure to cover the entire bottom of pan, and pressing up the sides a bit. 
Gently put this crumb crust into the oven to bake for 5 minutes then remove and cool. 
While this is cooling make your filling.
Whip your cream cheese in a mixing bowl with an electric mixer until fluffy.
Add sugar and mix til combined. 
Scrape the inside of your vanilla bean into the bowl and mix until combined. 
Add eggs, one at a time with mixer going on medium speed.  Stopping to scrape down the sides of the mixing bowl with a spatula in between each egg.
Once all the eggs are combined with the cream cheese, transfer 1/2 of this mixture into a separate bowl and put aside.
Add 2 cups of mashed sweet potatoes, 1/2 cup of Kahlua liqueur, 1 teaspoon of cinnamon, 1/2 teaspoon of ground ginger, and 1/4 teaspoon of fresh grated nutmeg to the remaining half of your cream cheese egg mixture.  
Mix until combined.
You should now have a cream cheese filling and a sweet potato filling in two separate bowls. 
You will now pour 1/2 of your cream cheese filling into the bottom of your crust in the spring form pan.  
Then pour 1/2 of your sweet potato filling on top of that and spread around gently so as not to disturb the previous layer. 
Then pour the other 1/2 of the cream cheese filling in and spread around gently.
Then the final layer of sweet potato filling goes in last.  
With a butter knife, gently drag through and lift, swirl and pull through the filling  to create a swirl pattern, being careful not to disturb the crust.
Place a pan of water on the lowest rack in your oven.
Place your cheesecake in the oven and bake, undisturbed for 45 minutes.  
Turn off oven and open door just a crack. 
Leave cheesecake in oven to cool for at least one hour before disturbing.  
After one hour, remove from oven and transfer to refrigerator to chill completely. 
When ready to serve, gently slide a butter knife between the cheesecake and the inside of your springform pan to separate it.  
Then unlatch the clamp of the springform pan.
With a firm metal pancake turner or spatula, go along to bottom of the cheesecake to gently release it from the base of the pan, then carefully slide the cheesecake onto a plate, platter, cake pedestal, etc... 
Serve chilled. 


Friday, November 27, 2009

Roasted Winter Vegetables


It wasn't until I had my child that I began to turn a corner in terms of how I felt about vegetables.  You could get me to eat almost anything raw.  But the only cooked vegetables I ever actually liked was green beans.  Perhaps it's because where my mother comes from, they cooked everything until there was no possibility of getting any sort of poisoning.  At the same time, unfortunately, all natural texture, color, fragrance, taste, and nutrients got  altered as well.  My mom loves to tell the story of how she'd find wads of soggy napkins full of spinach that I'd stuff in my pockets and smuggle out of the kitchen because I didn't want to eat it and I'd forget it was in the pocket and put the clothing in the dirty clothes hamper like that.
Anything other than legumes, I was never interested in eating if it was cooked.  Even the green beans, cooked in the same fashion as my grandmother cooked them, for hours, with a big piece of salt pork, long past when the heat sucked the green out of them, and they were more of a greyish green and if I remember correctly, slightly transparent!
There was a time in our historical past that there was the challenge of keeping foods fresh and safe to eat.   I believe that is where that long cooking technique comes from.  If you cook something long enough salmonella, ecoli, botulism, and other food-borne cooties would just surrender and die.  It also made it possible to perserve foods so they would last longer in the refrigerator.  Food was cooked in large batches on the weekend, and the same pot of beans, greens, or peas would be pulled out as a side dish every night for a week.  Crops were cooked then frozen and sometimes kept for months... or even longer... *horror music here* 
The nutrients were so thoroughly extracted from the vegetables by this long cooking that the leftover broth was often saved and drank.  They called this pot liquor.
Then I grew up, and at some point discovered that it wasn't that all those vegetables were on their own just generally disgusting.  It was their preparation that was so unappealing to me.  I've eaten foods from alll over the world, and learned that with most vegetables, fresh and not overcooking is the key to delicious flavor.

I'm telling you all of this to say that you too might find that you will like vegetables more if you learn how to cook them in ways that the flavor is still intact and in some instances, such as this recipe, enhanced by cooking techniques and the addition of some simple staple ingredients that you probably already have in your pantry.


Winter vegetables include squashes and root vegetables, basically.   I've seen recipes for roasted squash, and separately for roasted root vegetables, but I haven't seen one that combines them all.
This recipe is SO easy that you will be able to do this blindfolded by the time you make it a second time.  Even the kids loved these vegetables, because some elements like the carrots, butternut squash, and the beets are sweet.  I will leave the amounts open to your discretion depending on how many people you want this to feed.  Of course if you can, get your veggies fresh at the farmer's market!!!  There will be a world of difference in the flavor!!  If you're wondering why there's sweet potatoes, and yams on the ingredients, they are not the same thing.  Scroll over the link to see the difference.   Note also, that I've listed Olive Oil, not Extra Virgin Olive Oil.  It's different.  The extra virgin will have too much moisture in it, and your veggies will not caramelize and will instead be oily and soggy. 

THE PLAYERS: (your grocery list)


PREPARATION:
Drop your pearl onions into a pot of boiling water for 3 minutes.  Not longer.  Drain.

To peel them, cut off a small bit of the root end, then squeeze the other end so the white pearl onion comes out of its skin. 
Preheat oven to 375 degrees

Cut the rest of your vegetables in 1 inch chunks.  Leave skin on everything except the Butternut squash.  
Add a generous amount of herbs and enough olive oil to be able to thoroughly coat all of your veggies.  
Mix everything together by tossing with large wooden spoons. 
Spread your veggie mixture onto cookie sheets or jelly roll pans... (anything flat with low sides) in a single layer.  You may have to use more than one depending on how much you're cooking.   Don't try to crowd your veggies onto one pan.  It's important for them to caramelize and that won't happen if they are piled on top of each other.  
Sprinkle a little salt and fresh ground pepper over everything and put it in the oven!

Allow to cook for 20 minutes (or until golden brown edges appear on the top).
Toss to turn over. 
Allow to cook for 20 minutes longer or until veggies are golden brown at the edges and tender to the fork. 


Remove and arrange on a platter.  If you like you can sprinkle pepitas over the top for a little extra salty crunch!


Eat while still sizzling hot!  


Thursday, November 26, 2009

What To Do When You Cook Too Many Sweet Potatoes: Sweet Potato Oatmeal Pancakes

It's Thanksgiving morning.  Last night, the Austrian, the Pyrate, and I wrapped up our contribution to Thanksgiving Dinner.  We made two beautiful Sweet Potato Kahlua Swirl Cheesecakes, an Apple Persimmon Pie, and prepped a huge bowl of winter vegetables to be roasted this morning.   For the cheesecakes, the Pyrate peeled a heaping pile of sweet potatoes which turned out to be about double what I actually needed for the cakes.  So, this morning when we woke up, excited to watch the Macy's Thanksgiving Day Parade, I had the great idea of making pancakes with some of the leftover mashed sweet potatoes.  And perhaps tomorrow we'll bake the rest with a pecan topping to have with leftover turkey we bring back from my Auntie Ruby's House.


This morning we got the winter vegetables in the oven, then I set about the business of making these absolutely delicious Sweet Potato Pancakes.   You can serve them up any time of year.  It doesn't take long to boil a couple of sweet potatoes and mash them, however you can also use candied yams from the can if you insist you don't have time for that step.

We whipped  these up in less than 30 minutes, and shortly we were piled into my bed in our pajamas watching the parade, plates in hand, and happy as can be.  A very nice moment.  These pancakes were such a hit in our house this morning, that we've decided to make them a Thanksgiving tradition in our house every year.  I love traditions!  So I'm excited to add this healthy sweet treat to ours! 
Serve these up with candied pecans and pure grade A maple syrup.


THE PLAYERS: (your grocery list)
Oat Flour (You'll need one cup and it's found in the same section as regular flour in the subsection where there are organic meals, and/or in the organic section of the grocery store.  Alternately, use the link above to order it online.)  Whole Wheat Flour  (Also one cup of this and it's found in the same section where regular flour is found.) Demerara Sugar (this natural sugar can be found in your baking section, turbinado is also good, but if you can't find either you can use plain granulated.  I used vanilla sugar I made by storing a used vanilla bean in an airtight container full of Demerara sugar) Baking Powder (also in baking goods section where the flour is)Nutmeg (I prefer to keep whole nutmeg nuts in an airtight jar in my spice pantry instead of the pre-ground kind.  You can find whole nutmeg in most stores, especially in international groceries and organic groceries.  When using this you simply use the fine side of a grater or a rasp to take from the nut what you need then replace the rest in the airtight container for use at another time.) Cinnamon (the ground assortment) Cloves (ground) Egg  (You'll need two large eggs) Orange Juice (pulp-free) Milk (1 cup of 2 %  reduced fat) Vegetable Oil (canola, peanut, or vegetable oil are fine...)Mashed Sweet Potatoes (You'll need 1/2 cup)


PREPARATION:
Mix all dry ingredients together:
1c oatmeal flour, 1c whole wheat flour, 1 tsp baking powder, 1 tbsp sugar, 1 tsp ground nutmeg, 1 tsp ground cloves
 In a separate bowl, whisk together all wet ingredients.
 2 eggs, 1 cup orange juice, 1 cup milk, 1 tbsp oil, 1/2 cup mashed sweet potatoes.
Heat your griddle, add a little peanut oil so your cakes don't stick.
Check your batter, it should pour easily from a ladle.  If it seems a bit thick, add more milk a few tablespoons at a time til it's a consistency you can pour onto your griddle, but not runny.
Pour batter onto hot griddle and spread a bit in a circular motion.  
Do not disturb your cakes until they are done on one side.  
You will know when they are done when you see air bubbles form and begin to burst on the surface, and the edges begin to look dry. 
Flip them over quickly with a griddle spatula (pancake turner).
Let them cook on the other side until brown and  the center of each cake feels slightly firm and no longer soft in the center to the touch. 
Transfer done pancakes to a dish and keep warm in an oven set at the lowest possible temperature until ready to serve.  
Serve with butter, syrup, and garnish with candied pecans. 

Mmm. Mmm. MMM.

Wednesday, November 25, 2009

Sunday Farmer's Market Brunch for Ten... Part Five: Almondberry Tarte

 
Potato Leek Gratin, Farmer's Market Quiche, Almond Berry Tarte, Nectarine/Plum Pound Cake, Herb Infused Breakfast Meats.  Served on vintage, hand-painted, artistan signed plates from the Tonalo region of Mexico, 1940' s green Seneca Driftwood glasses, vintage Coorsite ball pitchers, crystal cake pedestals all from my collection.  All vintage wares come from my spelunking on ebay and in flea markets for a fraction of their worth. Shall I blog about my spelunking???(Ikea flutes bought on sale for less than $1 each... I have about 50 stored away for parties.)


 I should have made two of these Almondberry Tartes because this one dissappeared faster than I could blink!

No, there is no such thing as an Almondberry, so don't bother googling it!  The berry farmer at the farmer's market was kind enough to let me sample his berries Sunday morning.  The blackberries were tart, the blueberries were mild, and the raspberries were just right.  I decided to take a basket of each of them home, not quite sure what I would do with them.  I'd also purchased a lovely little plastic container from the Almond growers, filled with naturally sweet, fresh ground almond paste.  I didn't know what I would do with that either.  But I knew that marzipan was one of the austrian's favorite things from back home.

This pie/tarte looks pretty on the table, but I must warn you that structurally, you won't be eating this in neat little wedges because it falls apart.  You'll have to serve it with a spoon.  The berries are made into a compote then layered over a cream cheese/sour cream mixture, with almond paste in the very bottom.


THE PLAYERS:  
Blueberries, Raspberries, Blackberries   You'll need about 6 cups total, and you can use any combination of the three, two, or one kind of berry.  Demerara Sugar  I try not to use white granulated sugar when I can avoid it.  If you can't find Demerara or Turbinado sugar, the same amount of regular granulated will work as well.  Vanilla  I used Vanilla Bean Paste which you can find in most larger Whole Foods or other gourmet shops.  You can also use the same amount of pure Vanilla Extract.  Flour Pie Crust I don't mind making my own crusts when I have the time, however, you can also get perfectly good ready made pie crusts in the refrigerator section where you find the cookie dough, biscuit, croissant doughs in those tubes.  The one I use is not frozen, and is sold in a box with two crusts ready to go into your favorite pie dish or tin.  Sour Cream 1/2 cup.  Cream Cheese  Get the spreadable kind in the tub.  You'll need 8 oz. for this recipe. Egg  You'll need one egg... farm fresh?  find them at your local farmer's market! Almond Paste You'll find this almond paste sometimes in the form of marzipan in some larger grocers, almost all middle eastern, mediterranean, or international grocers.  Or use the links above to purchase online or make your own a day or so ahead of time...


PREPARATION:
Prepare your crust by placing it in a tarte dish/pan and turning in the edges so that they don't hang over the edge of the pan. 
Preheat oven to 400 degrees.
Spread the almond paste into the bottom of the pie crust and press into place with your fingers and smooth and place the dish on a cookie sheet covered with foil. 
In a medium size sauce pan cook berries, 1/2 cup of water, 3 tablespoons of sugar, and a teaspoon of cinnamon over medium heat. 
While berries are cooking, make the cream cheese filling.
In a mixing bowl combine egg, cream cheese, sour cream, and vanilla until well combined.  
Spread the cream cheese mixture on top of the almond paste in the pie crust. 
Your berries should be cooked down and a syrup formed.  Don't over cook, you want them to be softened but not completely broken down. 
Spoon the berries over the top of the cream cheese mixture. Save extra berries and syrup for serving at the table or use at another time over pancakes or waffles.

Bake your tarte for about 40 minutes, until crust edges are nice and golden. 

Allow to cool to room temperature before serving.  

Tuesday, November 24, 2009

Sunday Farmer's Market Brunch for Ten... Part Three: Nectarine/Plum Pound Cake


 Potato Leek Gratin, Farmer's Market Quiche, Almondberry Tarte, Nectarine/Plum Pound Cake, Herb Infused Breakfast Meats.  Served on vintage, hand-painted, artistan signed plates from the Tonalo region of Mexico, 1940' s green Seneca Driftwood glasses, vintage Coorsite ball pitchers, crystal cake pedestals all from my collection.  All vintage wares come from my spelunking on ebay and in flea markets for a fraction of their worth. Shall I blog about my spelunking???(Ikea flutes bought on sale for less than $1 each... I have about 50 stored away for parties.)

 
Sorry there's not a better picture of this delicious treat!  That's an improvement I'm working on!

I am so proud of this off-the-cuff throw-in that I came up with for our brunch!  Be sure to cursor over the little book icons here for additional tidbits and treasures...
This is another improvisation based on what was available at the farmer's market on Sunday morning.  There was one farmer who had dried fruits, both sulfured and unsulfured.  Beautiful  Nectarine halves and Plum halves.  You can use pretty much whatever fresh dried drupe (stone) fruit you want.  I recommend unsulfured  if you're buying from a farmer for several reasons. Sulfur is used on dried fruits to preserve color and allegedly nutrients.  But it changes the flavor and aroma of the fruit and to my experience gives it a faint bitter aftertaste.   If you're buying it fresh from the farmer they should have some unsulfured on hand.  This will not last long, so just get as much as you need and use it up within a week.  As for color preservation, I don't particularly think that's as important as flavor, and some of the color will come back when you reconstitute the fruit for this recipe.  There are different grades of dried fruit ranging from extra fancy to standard.  The higher grades are what you want for this, if you can find them.  What you get at a farmers market will be fancy to extra fancy typically, which have more moisture and depth of sweetness and flavor.  In your supermarket or grocery store, read the packaging, usually it will tell you the grade.  Otherwise just look for moist, flexible dried fruit.

You can also improvise with what kind of cake batter you use.  Any dense and moist loaf cake or  muffin batter will work.  For this recipe we use a standard pound cake recipe.  You can even make the cake batter from a box mix if you're in a serious hurry.  But pound cake batter is very simple... couldn't be simpler.  In fact I commissioned the Austrian to make the batter for me while I was whipping up some other thing for the brunch.   Pound cake was originally made with a pound each of butter, sugar, eggs, and flour.  It has evolved from there...

Alright so here it is!!

THE PLAYERS: (your grocery list)
 Unsalted Butter you'll need one cup of butter for this recipe.  I don't use salted butter when I cook.  I want to have the most control over salt intake as possible.  Eggs As you know, I'm going to tell you I love brown eggs from the farmer's market!  All-Purpose Flour You'll need 2 cups of this.  I like to get the unbleached sort because it makes me feel like I'm a little closer to nature.  :) Baking Powder  While researching ingredients for this recipe, I learned that this is a combination of baking soda, an acid (such as cream of tartar) and a moisture absorber (such as cornstarch).  This is info I'll keep in mind should I be making something that requires baking powder and I'm out.  If I've got cream of tartar, baking soda, and cornstarch I'm straight!  Demerara Sugar 1 cup will be used in this recipe.  You can use regular white sugar, but I prefer to use  healthier Demerara or Turbinado raw, steam-cleaned sugars in recipes that call for granulated sugar. You'll find this in most larger grocery stores, Whole Foods, Trader Joe's, etc... You can also subtitute other sweeteners but you'll have to experiment around with them to get the flavor and moisture content right... Vanilla You'll need 1 teaspoon of Vanilla extract, or the inside of one vanilla bean scraped into your batter bowl.  But DON'T TOSS THE POD!  Get yourself a jar or airtight, container  and put the used vanilla bean pod inside and fill with sugar.  In about a week this Vanilla Sugar can be used in all kinds of recipes for intensified vanilla flavor.   Dried Fruit  2 cups are needed for this recipe.  I used 1 cup of Nectarines, and 1 cup of Plums.  See my notes above regarding grades and assortments that work. Rum  Even though we have a great deal of rum in our liquor cabinet, most of it we didn't buy.  People bring alcohol as hostess gifts when they come.  Sometimes they bring rum.  If you must use a readily available famous brand get the best they sell.  Yes, even to cook with.  It will make a world of difference.  I try to always keep some Bajan  rum in my cabinet.  My favorite that's readily available in better grocers and liquor stores, is Mount Gay Rum.


PREPARATION:
Take butter and eggs out of the refrigerator at least 2 hours before you're ready to start so they come down to room temperature. 
Preheat oven to 375 degrees
In a medium sized saucepan put dried fruit and 1/2 cup of water and 1/4 of brandy or rum, and put on stove on medium heat to reconstitute. 
In a mixing bowl beat butter with electric mixer for 30 seconds (til fluffy)
Beat eggs, sugar, and vanilla together into butter .
Check your fruit on the stove and stir.  It should be absorbing the water, and becoming rehydrated.

Mix flour and baking powder together.
Gradually add flour mixture to butter mixture with mixer on medium speed.
Turn off the fruit. 
Coat the inside of 9x13 inch baking pan or casserole dish with spray Canola oil (or put some oil on a paper towel and wipe entire interior surface of pan)
Pour half of your cake batter into pan/dish.
With a slotted spoon, spread all of your reconstituted fruit in a layer over the batter, leaving the leftover juices behind in the pan. 
Pour other half of your cake batter over the fruit and spread around.  Don't worry if some of the fruit shows through.  This is a rustic cake and that will be just fine.  
Put into your preheated oven and bake until cake is firm to the touch in the center and golden brown.  About 40 minutes.
Remove from oven and allow to cool for at least 10 minutes then cut into large rectangular pieces, serve warm or room temperature.


You can substitute any of the following fresh fruit for the dried fruit in this recipe:
Pineapples, Peaches, Apricots, Mango, Tangerine.   Simply use them in slices... no pre-cooking needed.

Related Posts with Thumbnails

So, Brig, what does your music sound like?


Email for bandsQuantcast